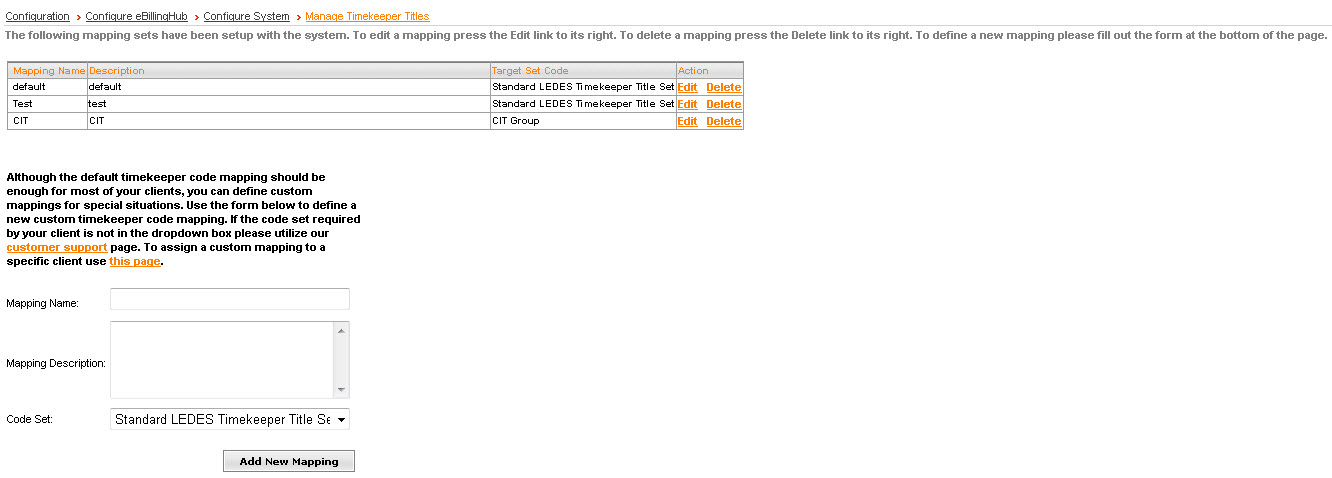
Manage Timekeeper Titles
The Timekeeper Title map associates your internal timekeeper titles
with the standardized titles allowed by ebilling vendors.
To set up or change your firm's default set of Timekeeper Titles:
- From the Main
Menu, go to Configuration.
- Click Configure
eBillingHub.
- Click the
Configure System tab.
- Click the Manage
Timekeeper Titles link.
- Click the Edit
link.

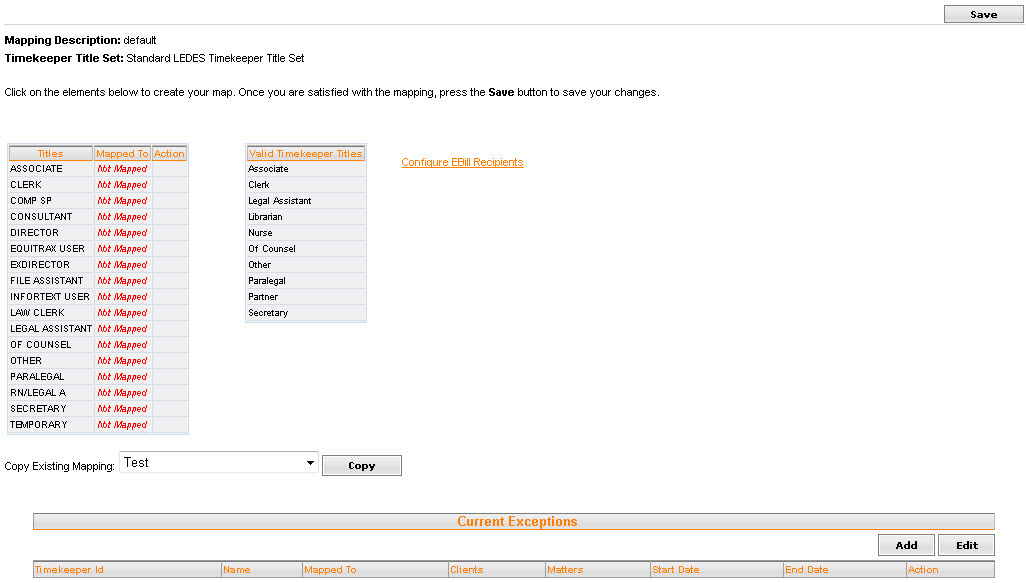
- The table on the left displays your
local timekeeper titles and their current associations.
- The table on the right displays
the timekeeper titles currently supported by eBillingHub.
- Add
a mapping.
- Do one of the following:
- Click on a local timekeeper title
from the table on the left and click on the appropriate title from
the table on the right to add a new association or to change an existing
one.
- Click
 to remove
a particular association.
to remove
a particular association.
- Click Save
when you are finished to save your changes.
To add a
Timekeeper Title Overrides Mapping:
- Click Add.
The following window displays.
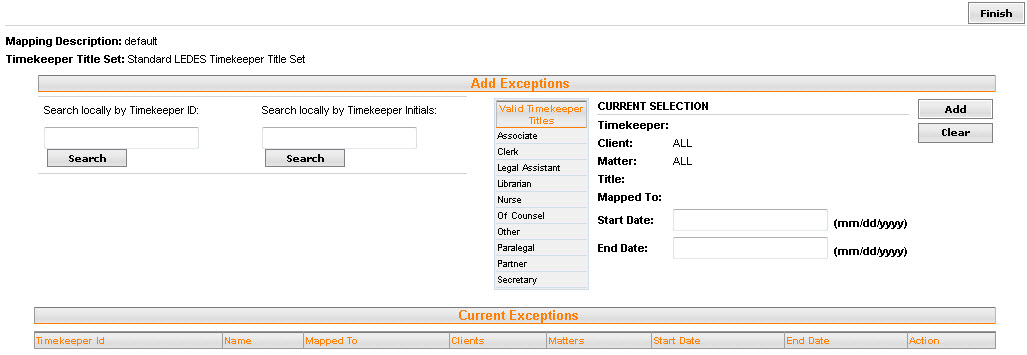
- In the Search
locally by Timekeeper ID or Search
locally by Timekeeper Initials fields, type the timekeeper’s
ID or initials and click Search.
The Timekeeper table displays.
- Select the timekeeper that you want to map
and select the new timekeeper title from the Valid
Timekeeper Titles table.
- In the Start
Date and End Date fields,
type the date range for this mapping to apply.
- Optional:
When you select a timekeeper
in step 2, click Show Clients.
The Hide Clients section displays:
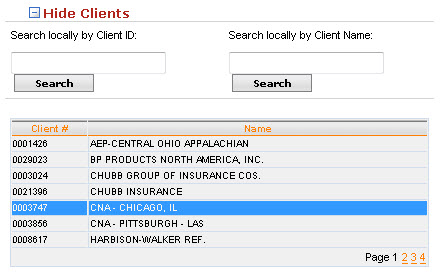
In
the Search locally by Client ID
or Search locally by Client Name
fields, type the client ID or client Name as it is stored within your
time and billing system and click Search.
Select
the client from the list.
When you select a timekeeper
in step 2, click Show Clients.
The following window displays:
In
the Search locally by Client ID
or Search locally by Client Name
fields, type the client ID or client Name as it is stored within your
time and billing system and click Search.
Select
the client from the list.
Click
Show Matters.
In
the Search locally by Matter ID
field, type the matter ID and click Search.
Select
the matter from the list.
- Once all of the appropriate mappings have
been made, click Finish and
then click Save.
To set up or change your Timekeeper Title map for custom set:
From
the Main Menu, go to Configuration.
Click
Configure eBillingHub.
Click
the Configure System tab.
Click
the Manage Timekeeper Titles link.
To add
a new mapping, type a Mapping Name, a Mapping Description, select
a Code Set if applicable and click Add New Mapping.
Click
the Edit link next to the new mapping name you created.
Note: The
Mapping Description and Timekeeper Title Set will be titled by the new
mapping name the you created, not the default, that is shown below.
- The
table on the left displays your local timekeeper titles and their
current associations.
- The
table on the right displays the timekeeper titles currently supported
by eBillingHub.
- Add
a mapping.
- Do one of the following:
- Click
on a local timekeeper title from the table on the left and click on
the appropriate title from the table on the right to add a new association
or to change an existing one.
- Click
 to
remove a particular association.
to
remove a particular association.
- Copy an existing mapping from the
drop down, then just re-map the titles that will differ from the copied
mapping.
- Click
Save when you are finished to save your changes.
- Apply the mapping to a client.
- After
the Custom Timekeeper Title mapping (Timekeeper title Override), you
would then go into the Timekeeper Title Exceptions, which is currently
listed as the Override.