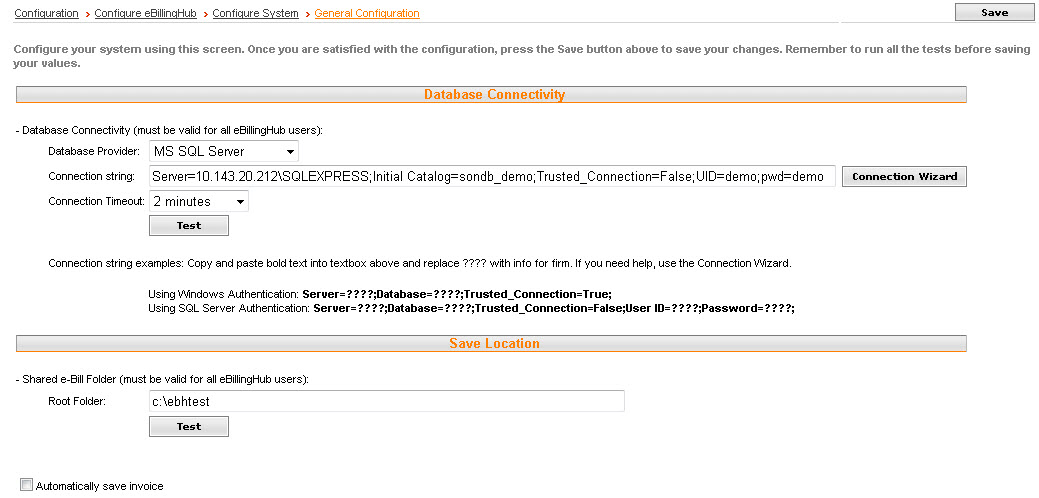
The General Configuration specifies the connections between eBillingHub and your system.


The Billing Wizard is the primary tool for submitting invoices through eBillingHub. The Billing Wizard Setups allows your firm to select different parameters and defaults depending on how your firm performs specific functions in your electronic billing process. These parameters are system wide - they affect all users, clients, and matters. The available options depend on your Time and Billing System.
Field |
Description |
Display Prebills |
Select this box to generate electronic invoices without having to post them first in your Time & Billing system. When the box is selected and an invoice is rejected by your client (or its e-Billing vendor), you will be able to quickly fix it without having to reverse and then repost the invoice again in your Time & Billing system. |
Validate Timekeepers |
Select this box to enable the Timekeeper Validation warnings in eBillingHub. eBillingHub will alert you when a billing rate is new or higher than before for a particular timekeeper ID, title, matter, and recipient combination. Note: When enabling the Timekeeper Validation feature, eBillingHub starts to gather timekeeper information. The Validation Summary page includes a warning if the timekeeper is billing at a rate that is new or higher than previously seen. No data is stored prior to activation. |
Display invoices that are partially paid |
When checked, invoices with partial payments will be displayed in the Billing Wizard. As a reminder, the invoices in the Billing Wizard are invoices that you have yet to generate, but already have partial payments, such as credits, prepays and retainers. |
Do not display invoices for matters where field '(click to change)' contains the following value |
Select this box and click the Click to Change link to hide invoices based on a UDF value. A message displays a list of fields. Choose one by clicking on it. In the box to the right of the line, enter a value. Anytime the selected value is in the selected field, the invoice will not display in the Billing Wizard. This is where firms exclude their paper bills. If you do not want to display invoices based on a UDF value, click Click to Change. A popup window displays showing a list of fields in your T&B system. Select one. In the box to the right of the line, type a value. For example, if you choose a field ‘eBill’ as the UDF field and ‘N’ as the value, NO invoice will be displayed for any matter where ‘eBill’ contains ‘N’. The value in this field must be one letter or word, not multiple words. You can also pull from a null value from the UDF, so if your ‘eBill’ UDF is blank on paper invoices, you will map to that UDF, then send an email to support@ebillinghub.com to have the Hub identify the Null value in that field. Otherwise the Hub will continue to look for a value in that field. |
Use field '(click to change)' to override the timekeeper used for expenses |
Select this box to use the value of the selected field as the timekeeper. This is used to override the timekeeper for expenses. |
Mark invoice as final if field '(click to change)' contains the following value |
Select this box, click the Click to Change link, select a field and type a value in the box to the right. Anytime the field value equals the value, the invoice will be marked as final. |
Do not display invoices older than |
Select this box to hide invoices that are older than the specified amount of time in the Billing Wizard. |
Do not display prebills older than |
Select this box to hide prebills that are older than the specified amount of time. This setting only takes effect when the Display prebills box is selected. |
Field |
Description |
Obtain Client Description from my Time & Billing System |
Some clients require that you include with your electronic invoices contact information about the client.
Recommended setting: selected. |
Percentages in Extended Fields are between 0 and 100 |
Some clients are responsible for paying only a percentage of a bill. You usually store this percentage in a user-defined field.
|
Use Timekeeper Billing Initials |
|
Use Rank as Timekeeper Title |
Select this box to pull the timekeeper's title from the Rank field. |
Include Bill-No-Print ("BNP") entries |
Select this check box to include BNP entries in your electronic invoices. |
Ignore time entries with $0 value |
Select this box to exclude timecards with $0 in your electronic invoices. |
Ignore cost entries with $0 value |
Select this box to exclude costcards with $0 in your electronic invoices. |
Obtain Invoice Description From Description Timecards |
When checked, the Billing Wizard extracts the invoice description from the description timecards. When unchecked, the Billing Wizard uses the default information for the invoice. Recommended setting: unselected. |
Move invoice start date to first day of month |
|
Move invoice end date to last day of month |
|
For posted invoices, use today's date as the invoice date |
|
For prebill invoices, use today's date as the invoice date |
|
Adjust for Rounding Errors |
Select this box to recalculate invoice totals to fix any rounding errors present in your Time & Billing System. |
Keep matter total when rounding |
When this box is selected, the matter total will remain consistent with the total in your Time & Billing System regardless of rounding. |
Include Applied Payments |
Select this box to display payments applied to an invoice. If the Display invoices that are partially paid option is selected, then when you select this option, payments that have been applied to the invoice will display as an adjustment line at the end of the invoice. |
Skip Expense Code mapping |
When this box is selected, eBillingHub will read the expense code from your Time & Billing system, completely ignoring any expense code mappings. |
Use Client Matter Code as Matter Number |
When this box is selected, eBillingHub will use the client matter code as the matter number. |
Display Interest-Only Invoices |
When this box is selected, interest-only invoices will be displayed in the billing wizard. |
Append Cost Code Description to Expense Description (But only if narrative is empty) |
|
Use mname as the matter number |
Select this box to use the value in mname as the matter number. |
Show the difference between actual and billed amounts as an adjustment |
Select this box to display the difference between the actual amount and billed amount as an adjustment. |
Show the difference between actual and billed hours as an adjustment |
Select this box to display the difference between the actual hours and billed hours as an adjustment. |
Show difference between base rate 01 and billed rate as an adjustment for matters where field '(click to change)' contains the following value |
Select this box to list the difference between the billed rate and base rate as an adjustment when the selected UDF contains the specified value. |
Flag Entries as Flat if description contains the following values: |
Select this box to flag entries as Flat when the description contains the specified value. |