Action |
Description |
For More Information, See: |
View Invoice |
View the invoice file in the format (for example, LEDES98B, LEDES 2000) that will be sent to the client. You may want to do this as part of a testing process for a new client. |
|
Update Status/Add Comment |
Manually enter additional information provided by your client or the eBilling vendor including tracking or reference numbers, detailed confirmation information, status, etc. |
|
Stop tracking invoice |
If you stop tracking an invoice, the invoice will be flagged back to new in the Billing Wizard. Therefore, stop tracking should mainly be used to only remove invoices from the Tracking/Active Invoices page. For example, invoices used for training should be removed. |
|
Save Invoice |
Save a copy of the invoice file in the format that will be sent to the vendor. You need to do this when this invoice is in Hold status because it must be submitted manually. |
|
Validate and Edit Invoices |
Opens the Validation Report window to edit an invoice. |
|
Synchronize Invoice |
Checks for payments in your system and updates the Total Payments and Remaining Balance, which can be displayed on Active Invoices (see Select Columns to Display on Active Invoices). When an invoice is fully paid, the invoice status is updated to Paid, and it is removed from Active Invoices. |
|
View Invoice Emails |
Displays the emails from ebilling vendors that have been read and related to this invoice. |
|
View All Invoice Information |
Displays the tracking information for all selected invoices. The tracking information for each invoice opens in a separate popup window. |
View Tracking and Rejection Information for All Selected Invoices |
View Selected ebilled Info |
Displays the tracking information for selected invoices in ebilled status. |
|
View Selected Rejection Info |
Displays the error reports for selected invoices in rejected status. |
|
Uncheck All Invoices |
Clear the check box for all selected invoices in the invoice list. |
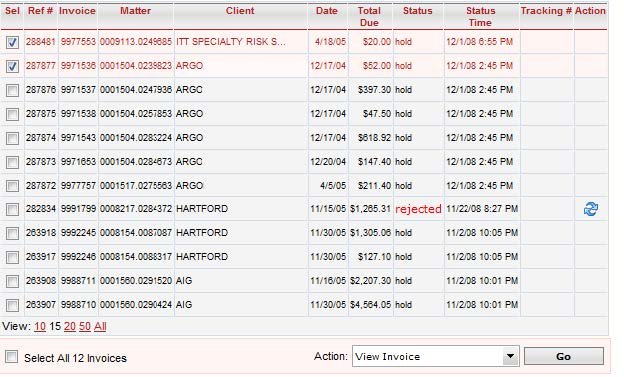
The Active Invoices window allows you to select one or more invoices and then select an action to perform on those invoices.
It is possible to select multiple invoices and perform actions on all of the selected invoices at the same time. To select an invoice for an action, click the check box to the left of the invoice. In the example below, the first two records are selected for action.
Select all invoices by selecting the Select All Invoices box in the lower left corner. Note that this will select only the invoices that are displayed on the current page. Going to a new page will deselect all the invoices selected on the page. If you would like to select all the invoices in the list, click All in the lower left corner to show all the items in the list in one page, then check the box to select all invoices. The status bar at the bottom of the list will display a count of the total number of invoices in the list and the total number of invoices selected.
Select Uncheck All Invoices from the Actions drop-down list to deselect all invoices and click Go.
The View Invoice action displays an invoice's electronic billing file in the format sent to the eBilling vendor or client (for example, LEDES989, LEDES2000). Use this action to view an invoice when testing a new client setup.
The most common format is LEDES98B:

The following is an example of a LEDES2000 XML invoice:

Here is an example of a specialized format for other vendors:

The Save Invoice action allows users to save the invoice to a file in the format required by its eBilling vendor. You may need to save invoices if they were put on hold because they have to be submitted manually.
Notes:
If you get an error message when you try to save invoices, you do not have access to this folder.
Once invoice files are saved in this directory, they can be moved to another directory.
The file name for the saved files is the invoice number and a file extension that is determined based on the invoice format. LEDES98B files will have a .txt extension. LEDES2000 files will have a .txt extension.
All invoice files can be viewed and edited in a text editor such as Notepad.
Any changes made to the files are not in eBillingHub or in your Time and Billing system.
If you edit the saved invoice file, it must be manually uploaded or sent to the vendor.
See Invoice Actions for a complete list of actions that can be done with selected invoices.
The Update Status/Add Comment action allows users to change the status of an invoice and add a tracking number and comments.
See Invoice Actions for a complete list of actions that can be done with selected invoices.
When you stop tracking an invoice, the invoice status is updated to Dead, it no longer displays on the Active Invoices window. It will display in the Invoice History. If you unintentionally stop tracking an invoice, you can add it back to Active Invoices by running it through the Billing Wizard or Quick Invoice, putting it on Hold in the Validation step (so that it will not be a duplicate submission), and updating the status to the correct status. See Invoice Actions for a complete list of actions that can be done with selected invoices.
eBillingHub updates the payment status of invoices that have previously been submitted from the Time & Billing system during the first step of the Billing Wizard when the Billing Wizard pulls invoices that are eligible for ebilling. If the Billing Wizard has not been run, an invoice may have been paid, but eBillingHub will still show it as an active invoice. The A/R Aging Report will also update the invoice payment status.
When the synchronization is complete, Active Invoices refreshes. Invoices that are now fully paid in your system are removed, and the Total Payments and Remaining Balance columns are updated. These columns are not displayed on the invoice list by default, but you can add them to the display. For more information, see Select Columns to Display on Active Invoices.
See Invoice Actions for a complete list of actions that can be done with selected invoices.
The View Invoice Emails action displays emails from ebilling vendors that have been profiled (related to the invoice).
See Invoice Actions for a complete list of actions that can be done with selected invoices.
The View All Invoice Information action displays the complete eBillingHub data record for an invoice including any tracking, rejection and status change information.
See Invoice Actions for a complete list of actions that can be done with selected invoices.
The View Selected eBilled Info action displays tracking information for ebilled invoices. An ebilled invoice is an invoice that has been submitted to and acknowledged by an eBilling vendor, who then sends a confirmation email back to eBillingHub. This confirmation triggers eBillingHub to update the status of the invoice to ebilled and to add tracking information to the invoice record.
See Invoice Actions for a complete list of actions that can be done with selected invoices.
The View Selected Rejection Info action displays error reports for rejected invoices. A rejected invoice is an invoice that has been submitted and rejected by an eBilling vendor, who then sends a rejection notification email back to eBillingHub. This notification triggers eBillingHub to update the status of the invoice to rejected and to add an error report to the invoice record.
See Invoice Actions for a complete list of actions that can be done with selected invoices.
To resubmit an invoice, there are two options, depending on the circumstance.
If the rejection was due to something that needed to be added/adjusted
in the Vendor Website, click  next to the rejected
invoice you want to resubmit on the Active Invoices page. However, if
the rejection requires adjustments to be made to the Time & Billing
System or mapping configurations, the invoice will need to be resubmitted
using the Billing Wizard or Quick Invoice to pull in the new data.
next to the rejected
invoice you want to resubmit on the Active Invoices page. However, if
the rejection requires adjustments to be made to the Time & Billing
System or mapping configurations, the invoice will need to be resubmitted
using the Billing Wizard or Quick Invoice to pull in the new data.
You will be asked to confirm the operation. When you click OK, the status of the invoice changes from Rejected to one of the following:
For more information, see Save the Electronic Billing File.
Note: The only time to use this icon is when making a change on the vendor site. If you need to make a change to a mapping, settings, etc., those too will need to be run through the Billing Wizard again for submission.