
Quick Invoice allows you to enter one or more invoice numbers for a single client and submit them for electronic billing through eBillingHub. Quick invoice does not do the same checks that the Billing Wizard does; it will allow you to bill an invoice for any client that is mapped in the eBillingHub, regardless of the status in eBillingHub or the age or payment status in your system. You can use Quick Invoice to submit invoices that have already been paid or are older than the time threshold set in the Billing Wizard configuration, but need to be resubmitted. You can also use Quick Invoice to submit paid invoices to build an invoice history in eBillingHub.
When you submit invoices with Quick Invoice, eBillingHub integrates and automates the following processes required for electronic billing:
There are four steps in the Quick Invoice Process:
To start Quick Invoice, log on to eBillingHub, point to Billing on the menu at the top of the window and click the Quick Invoice link.
Type one or more invoice numbers, one invoice number on each line, and press Next. You can paste a list of invoice numbers into this box, as long as the list contains just the invoice number. Invoices must be from a single client.
eBillingHub will pull invoice information from your Time & Billing system. If the invoices are not from a single client, the following message displays.
You need to correct this error before you can proceed.
If eBillingHub cannot find an invoice number in your Time & Billing system, the following message displays.

You need to correct this error before you can proceed.
The Invoice Number, Invoice Date, Matter ID, Matter and Amount columns display from your Time & Billing system. The status is unknown at this point, because Quick Invoice is not checking the payment status of the invoice or its status in eBillingHub.
When there are multiple pages, click on the page number at the bottom of the window to move to that page.
All of the invoices listed are selected. Click on an individual invoice to deselect it. In the following example, the first two invoices have been deselected.
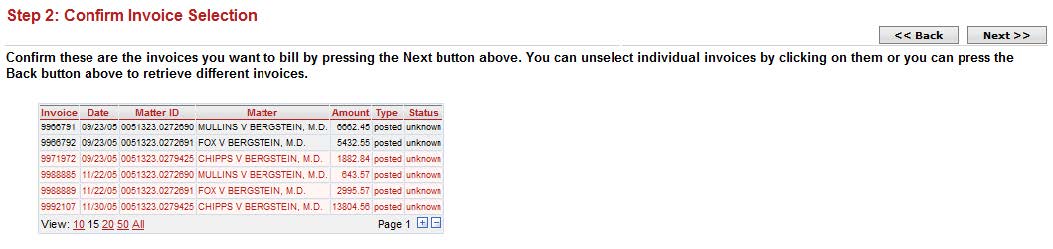
After you have confirmed the invoice selection, click Next.
See also: