|
Accessing the Advanced eBilling Editor
To access the Advanced eBilling Editor, click the Advanced control button from the basic eBilling Editor screen:
.png)
|
.png)
|
Use the maximize button  at the top of the page to expand the editor screen for better viewing. at the top of the page to expand the editor screen for better viewing.
|
Editor Controls
The Advanced eBilling Editor has three screen-level controls as explained in the following table:
|
Use this control
|
To...
|
|
.png)
|
Preview the invoice data in the LEDES file format required by the eBilling vendor or client
|
|
.png)
|
Save any edits to the invoice data
|
|
.png)
|
Close the Advanced eBilling Editor
|
Editing Workspaces
The Advanced eBilling Editor has nine tabs for accessing the workspaces for editing invoice data.

Note that the Matter tab contains two sub-tabs: Details and Tax Summary. Click here for a list of the editable fields in each workspace.
Navigational Tools
The Advanced eBilling Editor provides a navigational menu tree for selecting the workspaces. To display a workspace, simply click its name in the menu tree.
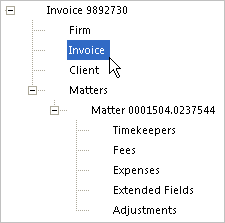
Alternately, click the desired workspace tab to display the editing workspace. Use the arrow buttons to scroll horizontally if all tabs are not visible.

Related Topics
.png) Editing Invoices Editing Invoices
Basic eBilling Editor Tasks
Advanced eBilling Editor Tasks
|