|
Expense codes identify your law firm's billing expenses such as court fees, witness fees and trial exhibits. The UTBMS Standard Expense Codes is a set of standardized codes accepted by eBilling vendors, and is the code set supported by eBillingHub.
Your law firm must have, at minimum, a default expense code mapping configured. The Map Expense Codes screen is used to create this default mapping. Additionally, if a client requires different expense codes than those in the default mapping, you can use this screen to create a client-specific map that associates client expense codes to the UTBMS Standard Expense Codes. Multiple clients can use the same expense code map, but an individual client can use only one expense code map.
Default Map
There are two basic steps for configuring the default expense codes map:
1. Select the default map from the expense codes map list
2. Create the associations between your firm's Time and Billing expense codes and the eBillingHub supported codes for the default map
All clients are automatically assigned the default expense codes map.
To configure the default expense codes map, follow these steps:
1. Click the Map Expense Codes option from the Configure System tab to display the Map Expense Codes screen.
2. Click the Edit link for the default expense code map to display the Configure Expense Code Mapping screen.
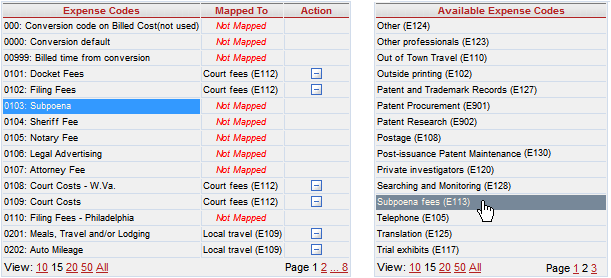
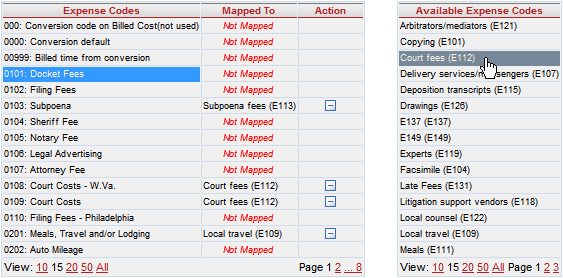
3. Select a code you want to map from the list on the left. (This list is populated with the current expense codes from your Time and Billing system, which may be different from the example graphic below.)
4. Select a code from the Available Expense Codes list that you want to map to the code you selected in step 3. (Available Expense Codes are the codes eBillingHub supports.) This action populates your choice in the Mapped To column. To remove an association, click the clear icon .png) . .
5. Continue mapping the remaining expense codes. When finished, click Save to save the new mapping.
Client-specific Map
There are three basic steps for configuring a client-specific expense codes map:
1. Create a new expense codes map
2. Create the associations between the client's expense codes and the eBillingHub supported codes for the new map (using the optional Copy Mapping function if desired)
3. Designate the new expense code map for the client
To create a new expense code map, follow these steps:
1. Click the Map Expense Codes option from the Configure System tab to display the Map Expense Codes screen.
2. Enter a name for your map in the Mapping Name field. This name is used to identify the map in the expense codes map list and also on the Configure Ebill Recipient screen.
3. Enter a brief description for your map in the Mapping Description field. This description is used in the expense code map list to help differentiate between maps.
4. Select the expense code set from the Code Set list box. If the code set required by a specific client is not in the list box, click the customer support link and request that the code set be supported by eBillingHub. (You will not be able to create the client-specific map until this request is met.)
5. Click Add New Mapping. This action populates the new map data in the expense code map list.
To map your client's codes to the eBillingHub supported codes, follow these steps:
1. Click the Edit link for the desired expense code map to display the Configure Expense Code Mapping screen.
2. Select a code you want to map from the list on the left. (This list is populated with the current expense codes from your Time and Billing system, which may be different from the example graphic below.)
3. Select a code from the Available Expense Codes list that you want to map to the code you selected in step 2. (Available Expense Codes are the codes eBillingHub supports.) This action populates your choice in the Mapped To column. To remove an association, click the clear icon .
4. Continue mapping the remaining expense codes. When finished, click Save to save the new mapping.
To copy an existing mapping and apply it to a new map, follow these steps:
1. Create the new map as instructed above.
2. Click the Edit link for the desired expense code map to display the Configure Expense Code Mapping screen.
3. Select the map you want to copy from the Copy Existing Mapping list box.
4. Click Copy. This action populates the Mapped To column with the expense codes that are the same between the two mappings.
5. Edit the new map (if necessary) by mapping additional codes or clearing unwanted associations. When finished, click Save to save the mapping.
To designate the new mapping to a specific client, follow these steps:
1. Click the this page link on the Map Expense Codes screen to display the Configure Ebill Recipient screen.
2. Select the client and expense code map as instructed here.
Related Topics
.png) Additional Configure System Options Additional Configure System Options
Designating an Expense Code Map for a Client
|