|
This help topic explains how to use the basic eBilling Editor to edit expenses data (individually and globally), add a new expense to an invoice and delete an expense.
Expenses Data
Editable data in the Expenses workspace includes:
|
Date:
|
The date on which the expense was incurred.
|
|
Tkpr:
|
Identifies the person who performed the activity related to the expense.
|
|
Type:
|
Unit means the expense is calculated using the Quantity, Rate and Adjustments values.
Fixed means the expense is a set amount (not based on other expense data).
|
|
Code:
|
A code that identifies an expense category such as photocopying services, filing fees, mileage, etc.
|
|
Quantity:
|
The number of items related to the expense such as number of photocopies, number of documents filed, miles driven, etc.
|
|
Rate:
|
The amount charged per expensed item.
|
|
Description:
|
Describes the expense.
|
Data in the Code and Description fields can be edited individually for an expense by overwriting the existing values, or globally for all expenses using the Replace feature. Both methods are explained in the following sections.
|

|
Any modifications made to an expense record is validated during the Validation Report process in the Billing Wizard or Quick Invoice.
|
To edit data in the Expenses workspace, follow these steps:
1. Click (or tab to) the data field you want to edit. (Double-clicking highlights all field text for editing.)
2. Edit the data by overwriting the existing text. As you begin to type, a pencil icon .png) appears at the beginning of the current row to indicate the field is being edited. For the Date field, you can also use the field box arrows appears at the beginning of the current row to indicate the field is being edited. For the Date field, you can also use the field box arrows .png) to select a date. For the Tkpr (Timekeeper) field, use the list box to select a different timekeeper Id. to select a date. For the Tkpr (Timekeeper) field, use the list box to select a different timekeeper Id.
3. Continue updating additional invoice data, (invoice information, fees, adjustments, timekeepers) if desired. If you are finished making changes, click Save to display the following message:
.png)
4. Click OK to close the message box.
To globally edit data in the Codes field, follow these steps:
1. Click the Replace list box arrow in the Expenses tool bar. (Alternately, right-click with the cursor on a row of expense data and select the Replace option.)

2. Select the Replace Expense Codes option.

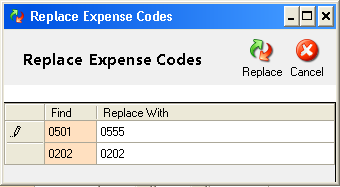
This action displays the Replace Expense Codes screen populated with the codes for all expenses on this invoice.
3. Click the expense code you want to replace in the Replace With column and type the new expense code. As you begin to type, a pencil icon .png) appears at the beginning of the current row to indicate the field is being edited. Replace additional expense codes if desired. appears at the beginning of the current row to indicate the field is being edited. Replace additional expense codes if desired.

4. Click the Replace button. This action refreshes the eBilling Editor with the expense code replacements.
To globally edit data in the Description field, follow these steps:
1. Click the Replace list box arrow in the Fee tool bar. (Alternately, right-click with the cursor on a row of expense data and select the Replace option.)

2. Select the Replace Description option.

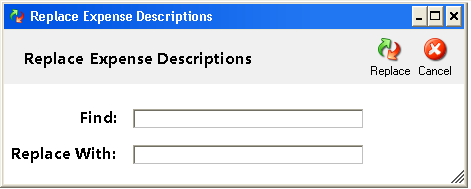
This action displays the Replace Expense Descriptions screen:

3. Enter one or more words that you want to replace in the Find field. Enter the replacement text in the Replace With field. Note that this action will replace every occurrence of the text with the replacement text throughout the expense descriptions.
4. Click the Replace button. This action refreshes the eBilling Editor with the description text replacements.
To add a new expense to the invoice, follow these steps:
1. Click the Add New Expense button in the tool bar. (Alternately, right-click with the cursor on a row of expense data and select the Add New option.)

This action creates a new expense row with a non-editable Id number. (The first new expense is assigned Id number 99999991. Subsequent new expenses are assigned 99999992, 99999993, and so forth.)
2. Click (or tab to) each editable field and enter the new expense data. For the Date field, you can also use the field box arrows .png) to select a date. For the Tkpr (Timekeeper) field, use the list box to select a timekeeper Id. Note that once you enter a value for the Quantity and Rate fields, the eBilling Editor automatically calculates and displays the Amount value. to select a date. For the Tkpr (Timekeeper) field, use the list box to select a timekeeper Id. Note that once you enter a value for the Quantity and Rate fields, the eBilling Editor automatically calculates and displays the Amount value.
3. Click Save when you are finished adding data for the new expense. This action displays the following message:
.png)
4. Click OK to close the message box.
To delete an expense from the invoice, follow these steps:
1. Click on the number in the far left column for the expense you want to delete. (To select multiple expenses, hold down the Shift key on your keyboard and then click the number of each expense you want to delete.)
2. Click the Delete Expense button in the tool bar. (Alternately, right-click with the cursor on a row of expense data and select the Delete option.)

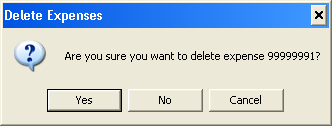
This action displays a confirmation message similar to the following:

3. Click Yes to confirm the deletion. This action refreshes the eBilling Editor with the selected expense removed from the list.
Related Topics
.png) Exporting Expense Data to Excel Exporting Expense Data to Excel
.png) Mapping Expense Codes Mapping Expense Codes
.png) Exploring the Basic eBilling Editor Exploring the Basic eBilling Editor
.png) Basic eBilling Editor Tasks Basic eBilling Editor Tasks
.png) Advanced eBilling Editor Tasks Advanced eBilling Editor Tasks
|