|
The Configure Email Settings screen lets you map a client in your Time and Billing system to the eBillingHub Free Form email client. This mapping enables you to handle invoice submissions by email when the client requires a format other than a supported LEDES format, or requires attachments to the invoice (such as expense reports). This mapping also lets you specify a list of recipients for the invoice, and optionally, a list of recipients for invoices associated with a particular matter.
|

|
Some vendors are already set up in eBillingHub with invoice attachments capability. The supported vendors list displays a green checkmark in the Attachments column for vendors with this capability. A paper clip icon appears for invoices in the Billing Wizard and Quick Invoice validation step when this feature is available.
|
Scenarios where you would want to map a client to the Free Form email client include:
· An invoice needs to be sent via email as a LEDES-formatted file with attachments
· An invoice needs to be sent via email as a LEDES-formatted file to specific email recipients
· An invoice needs to be sent via email in a format not supported in eBillingHub with or without attachments
|
|
eBillingHub does not generate the non-LEDES formatted invoice file. For example, if your client requires invoices in Portable Document Format (.pdf), you must create that file using a program external to eBillingHub and then attach it to the invoice email.
|
To map clients to the Free Form email client, follow these steps:
1. Click the Map Clients option from the Client Setups tab to display the Map Clients screen.
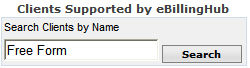
2. Search for the client in your Time and Billing system that you want to map. You can enter all or part of the client name, or the entire client number as search criteria. The example below shows a search for "AIG" as part of the client name.
.png)
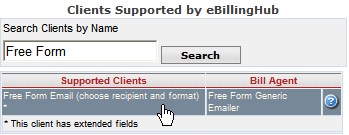
3. Click Search to display a list of all clients from your Time and Billing system that match your search criteria.
.png)
4. Select the client you want to map by clicking its name in the list.

5. Type "Free Form" in the Clients Supported by eBillingHub data box, and then click Search.
6. Select Free Form Email from the Supported Clients list.
This action displays the Configure Email Settings screen.
To configure email settings for the client, follow these steps:
1. Select a client from the Catalog Client list box. A Catalog Client is a client for which eBillingHub uses a custom format, or special formatting on a LEDES file. The Catalog Client list includes a generic email catalog and any customized formats supported by eBillingHub.
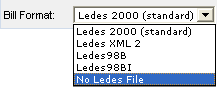
2. Select a format for the invoice data in the Bill Format list box. Invoices for the client will be submitted in this format when they are processed in the Billing Wizard or Quick Invoice.
|
.png)
|
If you intend to send an invoice in a format already created by your firm (such as a .pdf or .docx) and do not wish to use a file generated by eBillingHub, choose the No Ledes File option.
|
3. Select the BCC checkbox if you want the eBillingHub user who processes the invoice through eBillingHub to receive a copy of the email sent to the client. This optional feature helps verify and keep track of all submitted emails and attachments.

4. Based on the client you selected in Step 1, eBillingHub populates the recipient list with all known recipients for that client. To add a recipient, enter the email address of the desired recipient, and then click Add Recipient. (Use the Remove Selected button to remove a selected recipient from the list.)
5. Repeat Step 4 for each recipient that is to receive a copy of the invoice email.
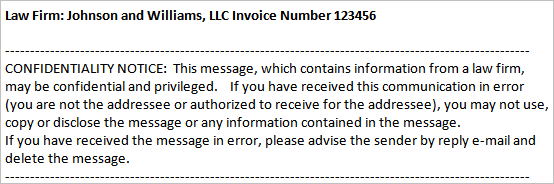
6. Edit the text of the email Subject line if desired. The default text for this field places the relevant invoice number and your law firm name in the subject line of the invoice email, similar to the following example:

7. Edit the email body text if desired. The default text for this field places your law firm name, relevant invoice number and a confidentiality statement in the body of the invoice email similar to the following example:
8. If you want to configure recipients to receive invoices for a specific matter, continue with Configuring Matter Recipient Overrides. Otherwise, click Save to save the email settings. This action displays a confirmation message:

9. Click Close to close the Configure Email Settings screen.
10. Click Save on the Map Clients screen to save your Free Form email client mapping. Once the mapping is saved, you'll be able to add attachments in the Billing Wizard and Quick Invoice validation step. Click here for more information.
Configuring Matter Recipient Overrides
The Configure Email Settings screen also lets you select a matter, and then configure specific recipients to receive emails and attachments for that matter.
To configure email recipients for specific matters, follow these steps:
1. Enter the desired matter number in the Create Matter Override list box, and then click Add New Matter. This action populates the matter in the Edit Existing Matter Override List.
|
|
eBillingHub does not validate the matter number, so be sure to enter the correct value.
|
Continue adding other matters if you want the same recipients to receive emails for them. Otherwise, continue with step 2.
2. Enter the email address of the desired recipient in the list box and click Add Recipient. This action adds the email address to the recipient list. Continue adding other recipients if desired. To delete a recipient from the list, select the recipient, and then click Remove Selected.
3. Click Save when you are finished adding matters and recipients. This action displays a confirmation message:
4. Click Close to close the Configure Email Settings screen.
5. Click Save on the Map Clients screen to save your Free Form email client mapping. Once the mapping is saved, you'll be able to add attachments in the Billing Wizard and Quick Invoice validation step. Click here for more information.
|