|
This help topic explains how to view additional information for invoices with an eBillingHub status of ebilled or rejected in Active Invoices.
How Ebilled Information is Processed within eBillingHub
When an eBilling vendor acknowledges a submitted invoice, the vendor sends back a confirmation email to eBillingHub. The contents of the confirmation email vary depending on the vendor. eBillingHub forwards the email to users as specified in their user profile, updates the invoice status to ebilled and adds tracking information to the invoice record.
To view tracking information for an individual ebilled invoice, follow these steps:
1. Click the word ebilled in the Status column for the desired invoice. (You can also view tracking information by clicking these statuses: in review, approved, payment sent, and reduced.)

This action displays tracking information for the invoice similar to the example below:
.png)
2. Click Print to print the tracking information to your default printer or click Close to close the sub-screen.
To view tracking information for multiple ebilled invoices, follow these steps:
1. Select only the "ebilled" status in the Status To Show list box. This action refreshes the invoice list with only ebilled invoices.

2. Select the desired invoices by clicking their associated checkbox in the Sel column.

You can also click View All and then click the Select All Invoices checkbox to select every ebilled invoice in the Active Invoices list.
.png)
3. Select View Selected eBilled Info from the Action list box, and then click Go.
.png)
This action displays tracking information for all ebilled invoices similar to the example shown above, but aggregated together on one scrollable page.
How Rejected Information is Processed within eBillingHub
If an eBilling vendor rejects an eBillingHub invoice, the vendor sends back a rejection notification email. The contents of the rejection notification email vary depending on the vendor. eBillingHub forwards the email to users as specified in their user profile, updates the invoice status to rejected and adds an error report to the invoice record.
To view an error report for an individual rejected invoice, follow these steps:
1. Click the word rejected in the Status column for the desired invoice. (You can also view error reports by clicking these statuses: appealed, and more info required.)

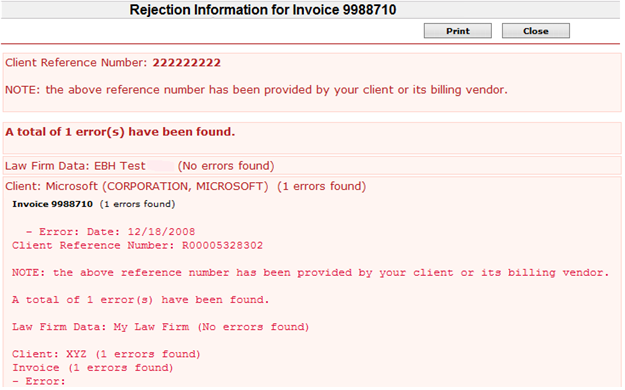
This action displays an error report for the invoice similar to the example below:

2. Click Print to print the error report or click Close to close the pop-up screen.
To view error information for multiple rejected invoices, follow these steps:
1. Select only the "rejected" status in the Status To Show list box. This action refreshes the invoice list with only rejected invoices.
.png)
2. Select the desired invoices by clicking their associated checkbox in the Sel column.

You can also click View All and then click the Select All Invoices checkbox to select every rejected invoice in the Active Invoices list:
.png)
3. Select View Selected Rejection Info from the Action list box, and then click Go.

This action displays error reports for all rejected invoices similar to the example shown above, but aggregated together on one scrollable pop-up screen. Invoices appear in numeric order by invoice number. To print the error reports, click the Print button. To close the screen, click the Close button.
Related Topics
.png) Invoice Statuses and their Meaning Invoice Statuses and their Meaning
.png) Rejected Invoices and How to Correct Them Rejected Invoices and How to Correct Them
.png) Invoice History Report Invoice History Report
|