|
This Billing Wizard step validates the invoice data against the client's billing guidelines and extended fields requirements, and then generates a report of any data errors that may cause the invoice to be rejected by the eBilling vendor or client. From this screen you can also view the raw invoice data from your Time and Billing system, access a tool for editing the invoice data and attach files to the invoice email.
To review and fix validation errors, follow these steps:
1. Check the Validation Report for errors related to each invoice. Validation errors appear as red text immediately below the invoice field that generated the error as shown in this example:
(1).png)
|

|
If you believe one or more errors are due to data being incorrectly extracted from your Time and Billing system, click the report page link to file an issue report with Customer Support.
The recipient and vendor for each invoice is displayed to the right of the invoice data. If you need to change the recipient, click the here link to select a new recipient.
|
2. If validation errors exist, follow the instructions in this step; otherwise, skip to step 3.
You can handle validation errors in several ways:
· Print a copy of the errors using the Print button and then click the .png) button to back out of the Billing Wizard without submitting the invoices. Use the printed error list to investigate and correct the validation errors in your Time and Billing system. Once the errors are corrected, rerun the Billing Wizard and repeat the submission process for the invoices. button to back out of the Billing Wizard without submitting the invoices. Use the printed error list to investigate and correct the validation errors in your Time and Billing system. Once the errors are corrected, rerun the Billing Wizard and repeat the submission process for the invoices.
· Print a copy of the errors using the Print button and then place the invoices with errors on hold by clicking the following checkbox:
 Need more information? Need more information?
The advantage of putting invoices with errors on hold is that you can still submit the other invoices on the Validation Report that do not contain errors. Invoices on hold will not be submitted to eBilling vendors. You can then investigate and correct the validation errors in your Time and Billing system, or by using the eBilling Editor as explained below.
|
.png)
|
If you intend to process any of these invoices together as a multi-invoice file, be sure to place the invoices on hold to prevent them from being automatically submitted individually.
|
· Print a copy of the errors using the Print button and then click the Edit Invoice icon  next to the invoice that contains errors. This action activates the eBilling Editor for you to edit the data fields associated with the errors. (Note that some errors may not be related to editable fields.) Click here for instructions on using the eBilling Editor. next to the invoice that contains errors. This action activates the eBilling Editor for you to edit the data fields associated with the errors. (Note that some errors may not be related to editable fields.) Click here for instructions on using the eBilling Editor.
|

|
Invoice data edited with the eBilling Editor does not affect data in your Time and Billing system. Consequently, edited invoice data in eBillingHub will no longer match the data in your Time and Billing system.
|
|
.png)
|
To see raw invoice data from your Time and Billing system, click the magnifying glass icon  next to the desired invoice. (Raw data is not editable on this screen.) next to the desired invoice. (Raw data is not editable on this screen.)
|
You are not required to fix errors prior to submitting the invoices to eBilling vendors or clients; however, doing so will increase the likelihood that the invoices will be accepted.
3. If the client for this invoice has been mapped to the eBillingHub Free Form email client, or the eBilling vendor is set up in eBillingHub to receive attachments, you can attach files to the invoice email by clicking the paper clip icon (1).png) . Click here for instructions on performing this task. . Click here for instructions on performing this task.
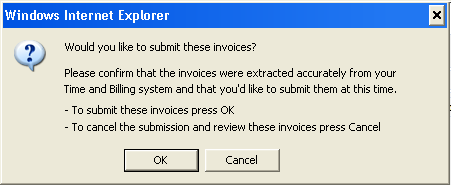
4. Click Submit to submit the invoices to the designated recipients (eBilling vendors or clients). The Billing Wizard displays the following message:

5. Click OK. The Billing Wizard then submits the invoices (except those on hold), and displays the Submission Report.
6. Complete the submission process with Step 3: Review Submission Report.
Related Topics
.png) Requesting Help with Invoice Errors Requesting Help with Invoice Errors
.png) Changing the Recipient for an Invoice Changing the Recipient for an Invoice
.png) Putting an Invoice on Hold Putting an Invoice on Hold
.png) Editing Invoice Data with the eBilling Editor Editing Invoice Data with the eBilling Editor
.png) Attaching Files to an Invoice Attaching Files to an Invoice
|