|
This help topic explains how to use the Advanced eBilling Editor to manage matter-level adjustments. Specifically this topic explains how to edit a monetary adjustment globally for all fees or all expenses, add a new adjustment and delete an existing adjustment.
|
.png)
|
To add or delete a fee or expense (as apposed to making an adjustment), or to edit an adjustment for a specific fee or expense, refer to Managing Fees and Managing Expenses.
|
Adjustments Data
Editable data in the Adjustments workspace includes:
|
Class:
|
Specifies whether the monetary amount is an adjustment (ADJ) or credit. An adjustment is an amount subtracted from the total fees or expenses. A credit is an amount added to the total fees or expenses.
|
|
Type:
|
Flat means the adjustment or credit is a fixed amount.
Percent means the adjustment or credit is calculated as a percentage of the total fees or expenses on the invoice.
|
|
Percent:
|
Defines the adjustment or credit as a percentage of the total fees or expenses amount (for example, 5.00%). You must calculate this percentage and include its value in the Amount data field.
|
|
Amount:
|
Specifies an amount for the adjustment or credit (for example, an adjustment of -100.00 or a credit of 100.00)
|
|
Category:
|
Identifies whether the adjustment or credit is for fees or expenses.
|
|
Task Code:
|
A code that identifies a task category.
|
|
Description:
|
Describes the reason for the adjustment or credit.
|
|

|
To enter a fee or expense reduction, include a minus sign (-) before the number in the Amount field. For example, to record a $20 expense reduction, enter -20.00.
|
To edit data in the Adjustments workspace, follow these steps:
1. Right-click on the desired row of adjustment data and select the Edit option.
.png)
This action displays the Edit Adjustment screen.
2. Click (or tab to) the data field you want to edit. (Double-clicking highlights all field text for editing.)
3. Edit the data by overwriting the existing text. For the Class, Type and Category fields, use the list box to select a value.
4. Click Update. The Advanced eBilling Editor then refreshes with the updated adjustment data.
5. Continue updating additional invoice data, (law firm data, invoice information, matter details, timekeepers, fees, expenses, extended fields) if desired. If you are finished making changes, click Save to display the following message:
.png)
6. Click OK to close the message box.
To add a new adjustment to the invoice, follow these steps:
1. Right-click on a row of adjustment data and select the Add New option.
.png)
This action displays the Add Adjustment screen with a non-editable number populated in the Adjustment Id field. (The first new adjustment is assigned Id number 99999991. Subsequent new adjustments are assigned 99999992, 99999993, and so forth.)
2. Click (or tab to) each editable field and enter the new adjustment data. For the Class, Type and Category fields, use the list box to select a value.
3. Click OK. The Advanced eBilling Editor then refreshes with the new adjustment added to the list.
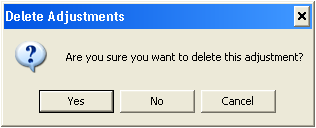
To delete an adjustment from the invoice, follow these steps:
1. Right-click on the row of adjustment data you want to delete and select the Delete option.

This action displays a confirmation message similar to the following:

2. Click Yes to confirm the deletion. The Advanced eBilling Editor then refreshes with the selected adjustment removed from the list.
Related Topics
.png) Editing Law Firm Information Editing Law Firm Information
.png) Editing Invoice Information Editing Invoice Information
.png) Editing Matter Details Editing Matter Details
.png) Editing Timekeeper Data Editing Timekeeper Data
.png) Managing Fees Managing Fees
.png) Managing Expenses Managing Expenses
.png) Editing Extended Fields Editing Extended Fields
|