|
This Help topic explains how to manually upload invoice data from eBillingHub and save it to an electronic billing file. Several scenarios may require you to perform this task:
1. The eBilling vendor is not supported by automatic submission of eBillingHub invoices.
2. The client requests a specific invoice be submitted by email or by logging into the client's site.
3. eBillingHub Customer Support requests a test file for debugging purposes.
|
.png)
|
These instructions are for creating a file containing data for a single invoice. For instructions on creating a file containing data for multiple invoices, click here.
|
To manually upload invoices to a file, follow these steps:
1. Run the invoices through Billing Wizard or Quick Invoice using the same process you use for other invoices. You can submit the invoices you intend to manually upload at the same time as other invoices.
|

|
Remember to put the invoices on hold on the Validation Report screen if they relate to scenario 2 or 3 above. (Invoices related to scenario 1 are automatically put on hold by eBillingHub.)
|
2. After you submit the invoices, click Live Update to display the Active Invoices screen. The invoices you want to manually upload should be displayed with a status of hold.
3. Select the desired invoices by clicking their checkbox in the Sel column.

|
.png)
|
To select invoices more quickly, first filter the invoice list to display only those invoices with a status of hold and then check the  checkbox. You can then deselect any invoices you do not want to include. checkbox. You can then deselect any invoices you do not want to include.
|
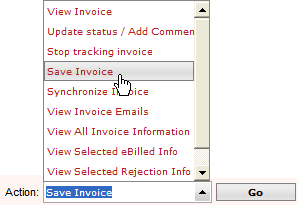
4. Select Save Invoice from the Action list box, and then click Go. This action uploads the invoice data from eBillingHub and creates the eBilling files.

5. Check for the files you just created in the root folder configured by the eBillingHub Administrator for storing eBilling files. (A file is created for each invoice you selected.) The filename is the invoice number with a .txt extension. For example, if you save invoice #9874891, the file is saved as 9874891.txt in the root folder.
|
.png)
|
It's a good idea to open the file to ensure it contains the invoice data before proceeding with the next step.
|
|
.png)
|
If you let the Active Invoices screen remain active while you perform Step 6, you will not have to reselect the invoices as instructed in Step 7.
|
6. Submit the eBilling files as instructed by the client or vendor. You may have to email the files (possibly with additional backup), or log into the client or vendor site and upload the files from your computer.
7. Access Active Invoices again and select the same invoices you previously chose.
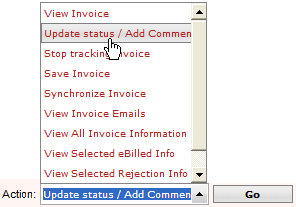
8. Select Update status/Add Comments from the Action list box, and then click Go.

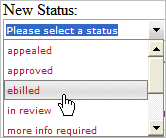
9. Select ebilled from the New Status list box on the Update Invoice Status screen.

10. Optional step: Enter a tracking number and additional information related to these invoices.
|
.png)
|
If you select multiple invoices in Step 7, the tracking number and comments you enter will be applied to all invoices. Make sure this is your intent before proceeding. To enter separate tracking numbers or comments, select the invoices individually in Step 7.
|
11. Click Ok. The Active Invoices screen now displays the status as ebilled for these invoices.
Changing the status to ebilled also removes these invoices from the Billing Wizard so they cannot be submitted again, and uses the date of the change for the start of the A/R (Accounts Receivable) Aging.
Related Topics
.png) Putting Invoices on Hold Putting Invoices on Hold
.png) Working with Active Invoices Working with Active Invoices
.png) Changing the Status of an Invoice Changing the Status of an Invoice
.png) Creating a Multi-Invoice File Creating a Multi-Invoice File
|